I try to keep up with all the goings on in the paper crafting world in the region, and I try to get to as many events as possible. So I thought I would create a post listing all the upcoming events that I know of, that way you can see them all in one place, and perhaps we will cross paths!
February 8-9: The Scrap Shacks Winterlude Winter Fun Crop. A fundraiser for PROKids
(Riverview/Moncton)
www.scrapshack.ca/events
March 2nd: The Cutting Garden is hosting a Crop from 4 to Midnight.
http://thecuttinggarden.ca/
March 9th: The Cutting Garden is hosting a full day crop at their store.
http://thecuttinggarden.ca/
March 20th & 21st: Shabby Shutters has guest designer Leica Forrest in house for 3 classes. (Antigonish)
www.shabbyshutters.ca/13660/
March 22-24: Moncton Crop & Create. Fantastic Designers and Classes.
www.scrapbookandcards.com/crop-and-create-moncton-2013
March 24th: Spring Craft Fair at the Cutting Garden, Halifax. A chance to buy or sell your crafty wares!
http://thecuttinggarden.ca/
March 26-27: The Scrap Shack hosts guest designer Leica Forrest to teach 4 different classes.
(Riverview/Moncton)
www.scrapshack.ca/events
April 5-7: Gadget Girls Crop, New Glasgow.
www.facebook.com/gadgetgirls.scrapbooking
April 26-28: The Cutting Garden is hosting a weekend crop in Halifax.
http://thecuttinggarden.ca/
May 3-5: Crop for the Cure, Sydney. A weekend crop where the proceeds will go to a great cause.
For more information email: dscrittenden@hotmail.com
May 3-4: Croppin' PEI at the Rodd Mill River Resort. Hosted by The Scrap Shack.
www.scrapshack.ca/events
May 10-12: Scrapbooking Cafe Online Crop, Truro.
www.scrapbookingcafeonline.ca
If you have an event you would like added, just drop me a line!
Tuesday 29 January 2013
Friday 25 January 2013
Photographic Revolution Tip #4~
Sunrise/Sunset:
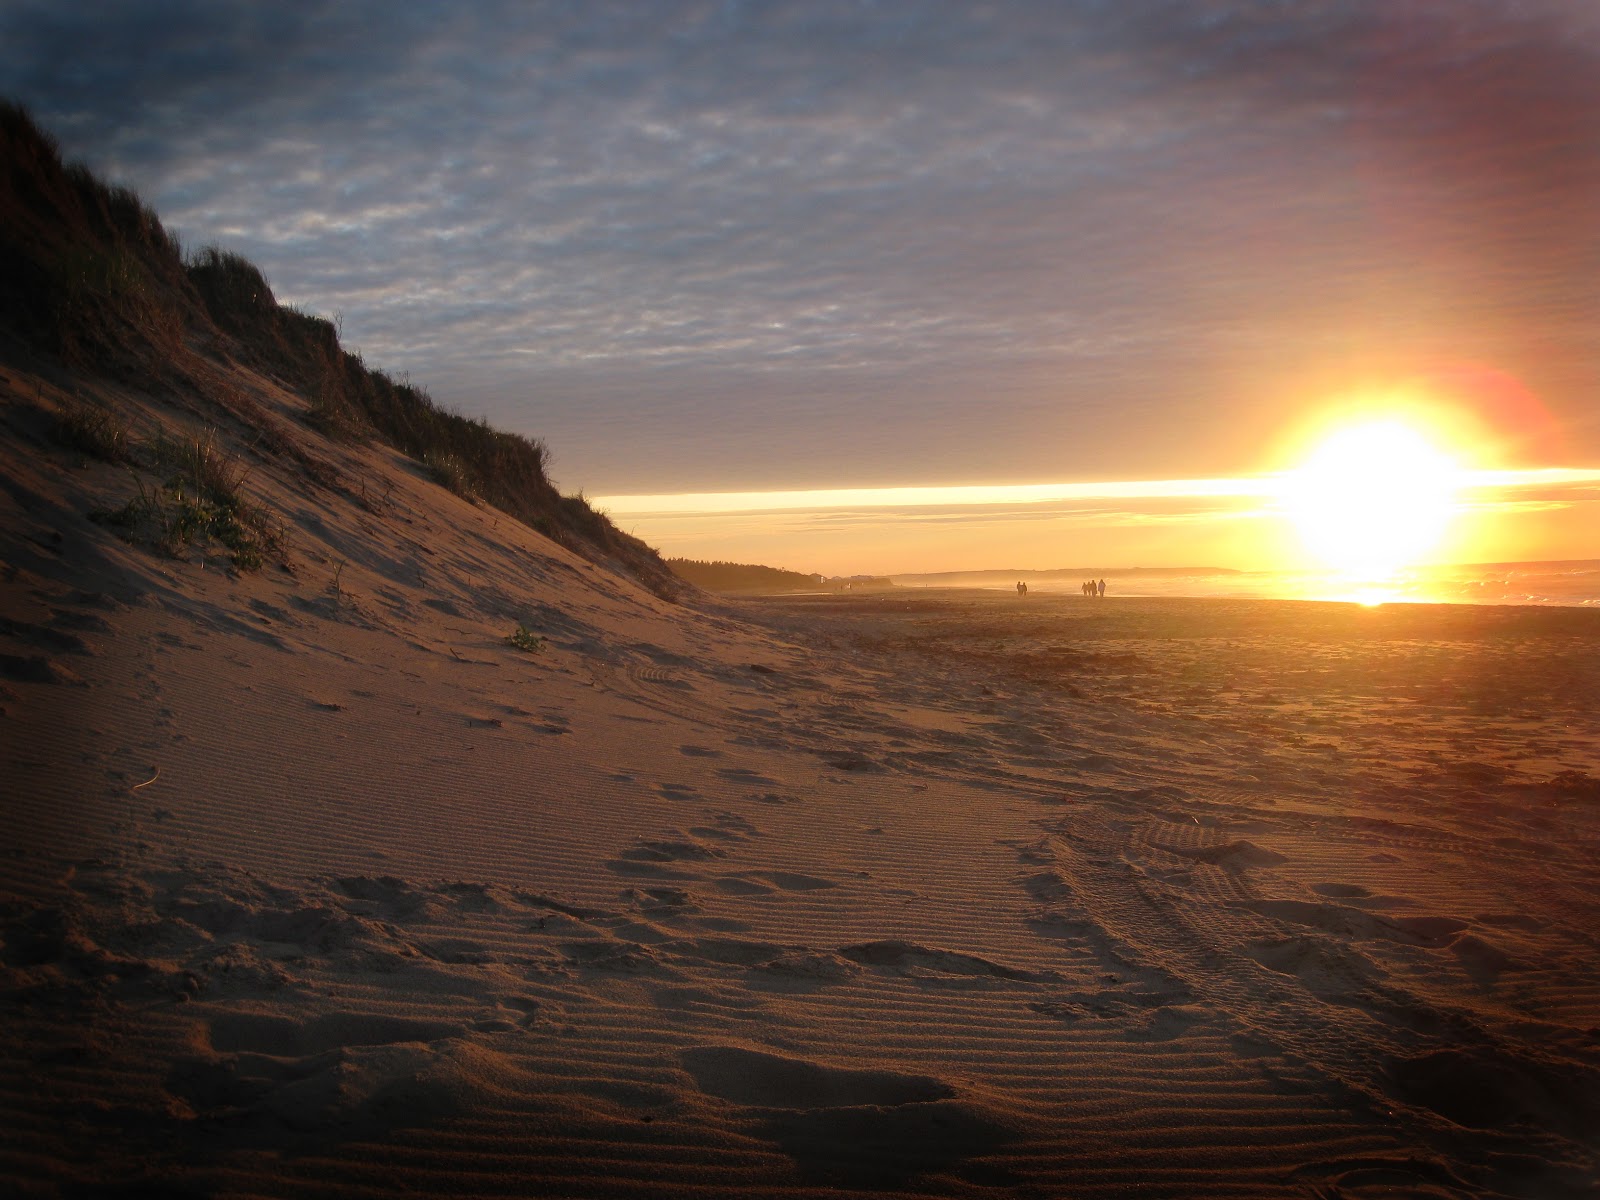
Who doesn't love a good sunset photo? I will be the first to admit that I have never taken a photo of the sunrise. But the same rules will apply whether you are shooting a sunrise or sunset. Taking a beautiful sunset photo is relatively easy, there are just a couple of simple tips to do so.
The first tip is to turn off your flash. Your camera will want to automatically have it on, as the light is low. But you do not need it. With the flash on, your camera will be using it's light meter for the area within the flashes range, your sunset will turn out very dark, and random objects in the foreground will be lit by the flash. With your flash being turned off, you will need to make sure that you are very still. Second, I generally get the camera to focus on the horizon. However if you have a focal point closer to you then you will want to focus on that.
My first sample photo is that of a sunset at Cavendish Beach, PEI. I don't really have a focal point, but I did get low to the ground (changing my perspective), so that I could see some of the footprints in the sand.

The next 3 images show sunset images that have a focal point in the foreground. Having your flash turned off creates a silhouetted image in the foreground of your sunset. It can make for some very striking images.


My final image is again at Cavendish Beach, PEI. Again I changed my perspective by getting down low and actually getting wet from the waves that I was trying to get in the image. Shooting a sunset with water of any sort always creates so much more interest to the eye. The reflective surface acts as a mirror, doubling the amount of light and colour.

Double the Fun~
I was asked recently if I ever create double page layouts. The answer is...yes, but obviously not as often as my single layouts. However on occasion I do have a group of photos that I feel the need to scrapbook as a series. That is when I create double layouts.
Sometimes when you have a series of photos, you are able to crop/print some of them much smaller to make a grouping like I did in this layout.

Or this one I matted most of the photos all together, making it look virtually seamless.


Sometimes you have one photo that you want to stand out. In this layout I put it on the left hand page, then I made somewhat of a collage on the right hand page.


All in all, when I create a double page layout I try to keep a continuous theme from page to page. That way your eye is drawn across your layout and seeing it as one larger layout. Rather than being broken up into pages.
Thursday 24 January 2013
Photographic Revolution Tip #3~
Change Your Perspective:
This tip works especially well with photos of children and pets. I also like to try this when taking photos of architecture.
Most photos are taken at adult eye level, mostly by habit. But I challenge you to try something a little different. For example, with children and pets instead of taking photos at eye level and merely pointing the camera down towards them, get right down on the floor. Get down and dirty to their level. You can take a much more intimate shot of your subject this way.
Try it when your child is drawing, blowing out their birthday candles, napping so sweetly or playing on the floor. Here are a few samples of what I'm talking about.


As I mentioned before, try this with architecture as well. It can give a very new and fresh perspective on your everyday shot of a building.

My last samples also change the perspective, only this time I got higher rather than lower. The first shot is from ground level, another shot of Zoe in the snow.

This second shot I got up higher. In this case, up a bank next to the road. I also rotated the camera which gives a very different perspective of the same situation.

MacIntosh Time~
Here are a couple of layouts I created using beautiful photos of dear friends of mine, the MacIntosh's.
The photos had fairly neutral colour schemes, so I was able to play around with the colours of the layouts.


The photos had fairly neutral colour schemes, so I was able to play around with the colours of the layouts.

The first layout was created using The Good Life Collection by Fancy Pants.

The second layout was created using the Ambrosia Collection by Bo Bunny.
Wednesday 23 January 2013
Photographic Revolution Tip #2~
Keep an Eye on Your Background:
It's easy to get wrapped up in the moment that you are photographing. Making sure that the subject of your photo is looking great. But keep an eye on what's happening behind them. If not, it can lead to a sometimes humorous, but always distracting result.
When you look at any professional portraits, one thing that they all have in common is that they all have some sort of neutral background. This can be almost anything: the wood siding of a house or barn, a wooded area, gardens, snow, the options are almost endless.
Once you have your chosen background, then you would be checking for any other objects that may be entering the shot and distracting the eye. This can be something like: a stick behind the head, looking like it's going through it. Antlers on the wall behind someone's head....I've seen it! People in the background, stealing the scene aka the photo bomb. Sometimes it can be something as simple as a sock on the floor in the background.
Soon enough it will become second nature to take a quick look around the frame of your shot before you start shooting.
Here are just a few samples of slightly distracting backgrounds.

So here is our first image. Zoe not only has a guard rail going through her head, but a stop sign coming out of the top.

Our second image, is pretty good, but the shovel on the ground is distracting.

Zoe is acting as the classic scene stealer in the background aka the photo bomber.

That's better, a clean, close-up image without anything distracting in the background.
West Coast Love~
Just a couple of recent layouts with our beautiful family from the west coast. Mommy is behind the camera taking the beautiful photos.
The first layout is one I created using The Good Life Collection by Fancy Pants.

The second layout I created for a class coming up using the For the Record 2 Collection by Echo Park

Tuesday 22 January 2013
Photographic Revolution Tip #1~
Get Closer/Zoom In:
Seems simple right? But it can make such a huge difference in your photos. When people ask me what they could have done to make their photos better, it's often the first thing that come to mind. Get closer or zoom in. This mainly pertains to photos of people or pets, but can also help when shooting macro images.
When you are taking portraits, you have to remember what the focal point of the image is. It's the people, not the pretty garden or scenery in the background. Not to mention that when you use your zoom, it is far more flattering than a wide angle shot.
This is my first sample. Zoe was kind enough to model for me. The first shot is typical of what I see. A horizontal shot showing the full length of the person. There are times that you do want a full length shot, like a wedding or prom. With that said, not all shots need to be full length.

So for the second image, I walked closer, zoomed in AND rotated the camera so that the image is now vertical. The focal point is now Zoe, and not the scenery in the background.

Another real world sample that most people could relate to would be taking photos at your child's Christmas concert. I see it EVERY time. People, way back in the audience with their point and shoot cameras trying to take photos of their children from their seat. Here is why your photos will not turn out:
1. Normally the person is shooting with flash, as you are indoors. The average point and shoot camera flash will only reach about 12 feet. It will not reach your child on stage.
2. When you use the zoom AND the flash, it makes the scenario in #1 even worse. When you zoom in, the amount of light being let into the lens becomes less. Meaning you need even more light from the flash, which wasn't working for you in the first place.
3. Being in the audience, your camera's light meter is metering for what your flash will reach, which is people's heads in front of you. Again not your child on stage. So the stage will look very dark.
This is what you need to do. Get out of your seat and walk up in front of the stage. Don't worry about the other people taking photos, their photos aren't turing out anyway :) Now your flash may reach. You can always try turning off the flash and being very still. This all depends on how dark the room is, and how bright the stage is lit.
Here is another sample of simply zooming in.


My final samples show the same image in 3 steps of getting closer. Thank you to my snow day pajama models!
Wide angle shot, showing too much background. The girls are not the focal point.

The second image I walked closer and zoomed in slightly. It's better, but you still have some background that you don't need. Plus the PJs are a little distracting.

Finally we have a beautiful winter portrait. The focal point are their beautiful faces, and not everything around them.

Stop by tomorrow for more tips and samples!
Warm it Up~
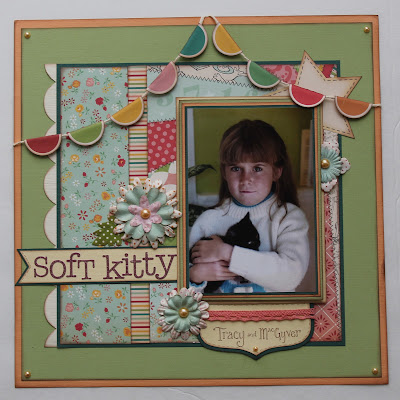
It's that time again! This is my sample for Use it Tuesday's Challenge #48: Warm it Up~ Red, Yellow and Orange.
This one was pretty easy for me, as I'm drawn to the warmer colours. So my layout was created with a bunch of scraps I had left over from a K&Company line that I have had for at least a couple of years now. I also found a few Martha Stewart Crafts flowers left in a pack. The sticker letters are about 5 or 6 years old and are by EK Success. Finally, all the cardstock came from my good old cardstock bag again, where all my single sheets of cardstock go for eternity.
This is what I came up with. Can't wait to se what you come up with!

Here's the link to Use it Tuesday's blog and the challenge post:
http://useittuesday.blogspot.ca/2013/01/challenge-48-warm-it-up-use-red-orange.html
Monday 21 January 2013
Baby It's Cold Outside!
Inspired by that bitter cold wind today I created this cute layout. The patterned papers and embellishments are from the Winter Frost Collection by We R Memory Keepers.


Photographic Revolution~
This week on the blog is going to dedicated to quick and EASY ways to take better photos, no matter what type of camera you are using.

I am making it my personal mission to get people using their cameras again. There is a epidemic out there of people taking hoards of bad photos with their camera phones. I understand that the cameras in smart phones have gotten better and that they make it so easy to upload images instantly. But there is a time and place for it's use. So if you would like your photographic legacy to be slightly blurry, dark and low res images....then carry on. Sure! You can use programs like Instagram to dress up those images, however, it's well....like putting lipstick on a pig. Once you're done....it's still a pig.
So enough of my rant. Join my photographic revolution! Dust off those cameras and start documenting your life like you mean it! (Hopefully with a little less duck face)
So pop back tomorrow for the first of five quick and EASY tips to taking better photos.
A little warmer weather inspiration!
Saturday 12 January 2013
Christmas Card Repurpose~
Every year while doing the after Christmas clean-up I look at the beautiful pile of Christmas cards that I received. Most years I end up keeping the homemade ones, sometimes reusing them. Some years I make some Christmas tags for the next year. But I thought this year I would try to go above and beyond with a couple more ideas.
So here is what I started with:


So here is what I started with:

So the first thing I did was cut out some cute little hearts from some of the glitter cards and with some red string, I strung them into a sweet little garland of hearts.

My next project used those cards that have a bit of a frame around the image. I made little gift boxes. Great for in a stocking or putting gift cards into.

This one I do almost every year, and that is to make gift tags. Something you will always need.

And last but not least the remaining cards I cut all to a similar size. Then I bound them and created this sweet little mini book. A great place to put all those mini photos that you get in your cards or other Christmas memories!

Some Christmas cards are just TOO pretty to get rid of! There are lots of great ideas online on how to repurpose them!
Thursday 10 January 2013
Getting Sketchy with the LadyBugs~
The Cutting Garden is back at it again with their monthly sketch challenges. Here is what I came up with for this months sketches for a layout and a card!


I used patterned papers from the Cakewalk Collection by October Afternoon.
Here is the sketch that I created my layout from.


I used patterned papers from the Sweet Nothings Collection by KaiserCraft
Here is the sketch I created the card from.

All the patterned papers that I used are available at The Cutting Garden.
Check out The Cutting Garden online at
http://thecuttinggarden.ca/2013/01/05/january-challenge-starts-today/
Wednesday 9 January 2013
Just for Fun~
One of the layouts I created this afternoon Just for Fun. All for love Mandy created a comic book wall in their home for their anniversary photo shoot. I thought the photos turned out fantastic and couldn't wait to get my hands on one! I picked up some great little patterned papers by Best Creations Inc, their Space Age Collection at Carsand Mosher in Truro. Here's what I came up with.


Photo by ACphotography
http://www.facebook.com/pages/ACphotography/232785980118974
Tuesday 8 January 2013
Sketchabilities~
Today I created a layout based on a sketch from a challenge blog called Sketchabilities.
I used The Good Life Collection by Fancy Pants.


I used The Good Life Collection by Fancy Pants.

Here is the original sketch that I went by:

http://www.sketchabilities.blogspot.com
Challenge #47 Make it Sparkle~
This is my very first post for Use It Tuesday. This is a challenge blog that urges you to use up some of that scrapbook stash you have hidden away.
This weeks challenge is to use some sparkle. There are so many ways to do so! So come on!! Try it out, create ANYTHING with a little sparkle and enter the challenge. A great way to start crafting in the new year!!
Here's what I came up with from my stash.


This weeks challenge is to use some sparkle. There are so many ways to do so! So come on!! Try it out, create ANYTHING with a little sparkle and enter the challenge. A great way to start crafting in the new year!!
Here's what I came up with from my stash.

This is what I pulled from my stash.
Even the cardstock came from my cardstock carry bag where single sheets go to die and rarely get used.

So play along if you'd like. Check it out here:
useittuesday.blogspot.ca/
Subscribe to:
Posts (Atom)